The Design Options feature in Revit allows for the creation
of multiple design schemes inside the same project model file. However, if you do
not understand the basics of the process, you can easily get confused or lost.
The following is a simple list of the basic steps in
the design option process:
·
Create an Option Set
·
Create Options within the Option Set
·
Add model elements to the Options
· Create views for each option
Here is a step by step exercise of a basic Design Option
scenario...
- Go to the Manage ribbon tab and click on the Design Options button. After the Design Options window pops up, click on the New button under Option Set.
- Select the Option Set that was created. Click the Rename button and give it an appropriate name.
- With your new option set selected, click on the New button under Option (not option set).
- You should have 2 options under your Option Set, Option 1 & Option 2.
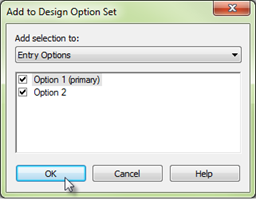
- Go to your model. Select all the model elements that encompass the area where the design options will take place. This includes any connecting walls, doors, windows, casework, etc. Click the Add to Set button on the Manage tab. The Add to Set dialog box will open. Leave both options checked and click OK. If you do not have any existing elements to add, that is OK, you can create elements starting with step #8.
- Now you have 2 copies of everything (added to the option set). One copy is in Option 1 and the other is in Option 2. None of these elements will be selectable or editable until you change the Active Design Option.
- The Active Design Option setting is normally set to Main Model. It will display everything not part of a design option, and all the elements in a Primary design option. Although you can see stuff in a primary design option, you will be unable to select those elements until you set that design option to be active. Setting a design option to be active can be achieved via the Manage ribbon or at the status bar at the bottom of the Revit GUI (program window).
- Set the active design option to Option 2. Select the elements you want to remove from Option 2, if any, and delete them. Edit the remaining elements in the option and/or create new elements.
- Change the active design option to Option 1. Notice the changes made to to Option 2 have vanished.
When you are ready to view your progress, you
can create views for each option. From
within each view’s visualization/graphics settings, change the active design
option from Automatic to the appropriate option.
The images below show two
design option examples…


THANKS FOR SHARING SUCH A AMAZING WORK
ReplyDeleteNICE WORK
CoBie adaptation in UK